


")

")
Discovering the world through photography
February 21, 2011 by Richard McGuire · Leave a Comment
The following is a post I made to the Flickr group Travel Photography in a discussion about the best country for street photography. One of the members of the group raised the question of when you seek permission to take a stranger’s photograph. Clicking on the thumbnail pictures will take you to larger versions in my Flickr stream.
The permission thing is tricky. Often, if you ask beforehand, people pose rigidly, and it’s difficult to get a natural looking shot. On the other hand, just walking up and snapping a photo of someone can be very rude, and can get you in trouble.
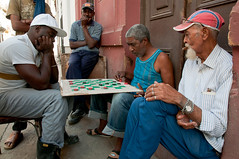
I vary my strategy depending on the culture and situation. If people are engaged in an activity, and if I speak the language, I may ask permission, but tell them to continue doing what they’re doing. They act stiff at first, but I keep shooting, and after a while they ignore me. That’s the strategy I used for this shot of men playing checkers on a street in Havana, Cuba:
If people are in a public place doing what they are normally doing, I sometimes don’t ask permission, but make my presence known, and refrain from shooting if anyone clearly objects. That’s what I did for this shot in Havana of men in a park arguing about baseball. I wasn’t about to interrupt their heated argument to ask permission, but I didn’t hide the fact that I was taking pictures.
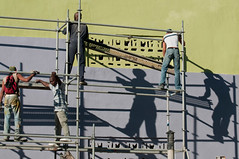
If people are at a bit of a distance and not clearly recognizable, I have no problem sneaking a picture with a long lens as in this shot of construction workers in Havana:
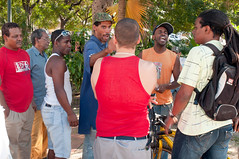
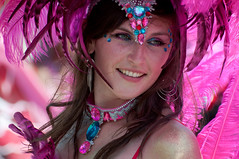
If people are engaged in a fun event like a festival, I have no problem shooting fairly close shots with a long lens and not asking permission, as in this shot at Toronto’s Caribana festival:
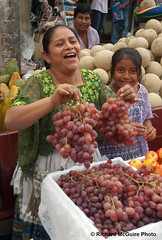
Sometimes I’ll simply ask people to pose and tell them what to do. If they’re engaged in an activity, and not just standing rigidly, it can work, as in this shot of a grape seller in Guatemala:
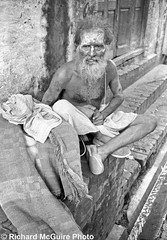
If you don’t speak the language, or if you’re at a bit of a distance and there’s noise, “permission” can simply be raising your camera part way, pointing to it, and smiling at the person. If you get a nod, or at least the person doesn’t raise their hand to object, you have permission. That’s how I got this picture of a holy man in India a number of years ago:
I was shooting film then, but today you have an advantage. Showing off the picture to your subject on the LCD screen can often invite further pictures, and even shots of others around who see it!
February 5, 2011 by Richard McGuire · 19 Comments
When I planned my trip to Cuba, I had very little idea what to expect as to what it’s like doing photography in Cuba. I posted to a couple of Flickr groups asking about photographing in Cuba, and received a few tips and suggestions, but still didn’t really know what to expect. This posting attempts to address some of the questions I had.
First of all, despite its authoritarian style of government, I never had any problem from officials as a foreigner taking pictures. The only time it was ever an issue is when I first arrived at the airport and they scanned my carry-on luggage after I arrived — a new experience. Seeing my camera and collection of lenses and accessories, the people at the scanner asked if I was a “periodista” (journalist). I replied that I was not and that the camera was for personal use. They accepted my explanation with no further issue. Cuba, like many countries, requires that journalists obtain a special visa, so entering with just a tourist card would have been a problem.
Other than that, I had no problems from authorities whatsoever. This contrasts with trips to the United States where I have been hassled, and it seems that to some people photographers are terrorists, pedophiles or worse. And Britain apparently is even worse than the U.S. for official harassment of photographers. I’m not naive, and in the unlikely event that I encountered mass demonstrations in Cuba and photographed them, I would likely encounter problems. But generally, Cuba is much more photo friendly than many other destinations.
I find that in many countries there’s an expectation that foreigners always have cameras and are always taking pictures. This was certainly the case in Cuba, and it can work in your favour as a photographer. At home, people sometimes wonder why you are taking pictures. In places like Cuba, it’s just assumed that that’s what foreigners do.
I also wondered about the safety of walking around with a camera. Here again, I felt much safer than in many other countries of Latin America. You do hear of occasional cases of snatch and grab attacks on tourists in Old Havana, but I never saw anything to suggest concern. I tend to carry the camera with the strap around my neck and shoulder, and with at least one hand on it, and I constantly scan my surroundings for people who might be problems. I saw many tourists carrying their cameras with a lot less care and attention, and though I don’t recommend that, I never saw problems.
Travelling in general, the most dangerous situations are usually when you are completely alone with your attacker, or when you are in a dense crowd (such as on a crowded bus or train) allowing someone to steal without your knowledge. Rarely in Cuba was I in either situation. There are always people around (and very often police), and I didn’t take the city buses. Thieves are less likely to strike when there’s a good mix of people around, but not so many that they can get away undetected or slip into a crowd.
I usually kept my camera in my bag when I was walking at night, but I never felt threatened carrying it during the day, even in some fairly run-down parts of Havana. There are two big advantages to carrying your camera in the open. First, it’s ready when you need it, and you don’t need to fuss around and possibly lose a shot. Secondly, the camera itself attracts attention of people, who will often ask to pose. Several times people saw my camera and suggested shots to me — sometimes because they wanted money, and sometimes not.
As for photographing people, I would say that four different scenarios come into play.
1. Professional tourist models
In tourist areas like Old Havana and Trinidad, there are some Cubans who make a living by posing for pictures for tourists. If you look at Flickr’s Cuban groups, you’ll often see the same human subjects over and over. These are generally people who pose for $1 CUC or less. One old guy in Trinidad even sits on a donkey that has an English sign on its forehead saying: “For rent. Photo 50c”.
Some of these models are great. A favourite of mine (and many other photographers) is Graciela, an old woman in Old Havana with just two loose front teeth, who poses with a big cigar. José Manuel Soto Flores was another colourful character in Old Havana. He had an album of pictures of himself, and had even been in guidebooks. He carried special ID that showed he was allowed to carry out this modeling and be paid in hard currency, and many of the other tourist models had the same credentials.
Some of the models were more contrived, decked out in colourful costumes. Some even had pets such as dogs and cats dressed up with them. I engaged some, with mixed results.
Some were pretty insistent that you only got one frame for your $1. Others let you take several shots. I generally got better results when I chatted with them for a while first, and of course I had to move some into better light.
2. Opportunistic tourist models
These people are not pros, but their aim in posing for you is to get a little hard currency. Sometimes they initiated the exchange with me, asking if I would like to photograph them or their friend. Sometimes, I first noticed them, and asked them to pose. They agreed on condition of payment. Whether you pay or not and how much you pay in these situations is always a judgment call. Some people raise moral issues about photographers encouraging dependence of these people. Generally though, I didn’t mind paying a bit if I got some decent shots from it. Some people were so delighted to earn a bit of money that they were happy to let me keep shooting them after I’d paid them. Sometimes though, people who asked to be photographed for money didn’t interest me, and I turned them down.
3. Photos for photos’ sake
Very often I had encounters with people and took their pictures without money ever being part of the equation. Often these were the most satisfying encounters, as I was able to chat with the people first and develop a bit of a bond. Very often they were delighted simply to see their images on the LCD screen. Usually, these were encounters that I initiated. I sometimes just walked up to people or walked into a shop and asked if I could photograph them doing whatever they were doing. Very often, people agreed. In one shoe repair shop, I photographed the two men working, and then one of them asked to pose with his wife. I promised to mail them copies of the pictures, but that was an offer on my part and not a condition for being photographed. Sometimes people agreed to let me photograph them, even though they didn’t seem enthusiastic. Only rarely did I get an outright rejection.
4. Candid photos
These are photos I took of people in the street without their permission. There are moral issues here, but I feel that generally if you don’t invade someone’s privacy, and they’re just doing something normal on the street, they are fair game. Still, I use some circumspection with these shots. It’s one thing if people are incidental to a street scene and are part of a larger picture. It’s a bit invasive though to pull out a long lens and do a close-up of their face without their knowledge or permission. You often get a more interesting picture if the person isn’t aware of the camera. Sometimes, I would smile and wave to a person after taking a shot of them, to see what kind of reaction I got. In most cases, people would see me with the camera taking general scenes of the street and not really care if they were in the frame or not.
While people are often the most interesting subjects, Cuba has numerous other fascinating subjects, not the least its old classic cars and crumbling old buildings. The American cars of the late 1940s and 1950s are very photogenic with their curves and art deco styling. The point of view and lighting for such shots is always important. For cars, low and close seems to work best.
The strong tropical sunlight is always a challenge. I found that in Cuba I often got my best shots very early or late in the day when the sun was low. The light was often very beautiful at these times, and the pastel colours of the buildings intensified it. In the middle of the day, it was essential to pay attention to light and shadows. With buildings of multi stories in Havana, it was often very easy to find areas of open shade for excellent lighting even in the middle of the day. Trinidad and Viñales had a lot more one-storey buildings, making it more of a challenge. I almost always carried my SB-900 flash with me, and very often when I shot in open sun, I would use a fill flash. This is essential in bright sun when there are strong shadows. I brought my tripod with me, but was less likely to walk around with it. I still managed to get some good sets for HDR photography with hand holding the camera and shooting quick frames in burst mode.
In a two-week trip to just three places, I feel I only scratched the surface of Cuba’s photographic potential. I didn’t try any locations that would have required official permission. And I didn’t try any more extensive shoots of models or other people requiring complex lighting arrangements beyond one flash. There’s a lot more for another trip, and I’m eager to return to Cuba with my camera again.

José Manuel Soto Flores is a professional tourist model in Old Havana. He carries government-issued ID that lets him engage in this business.

These two guys asked for a little change after I took their picture, but they certainly weren’t professional models, and weren’t likely used to being photographed.

In this candid picture of men arguing over baseball in Havana’s Central Park, it would have been out of the question to ask permission first and still have people looking natural. Still, it was obvious to them that I was photographing, and only one man seemed to mind (he covered his face with his hand). I just kept shooting, and tried to avoid getting the man who didn’t want to be photographed. By the time I fired this shot, they seemed oblivious to the fact that I was there, and were completely engrossed in their argument.

Although I took this shot later in the day, and the sky was partially overcast, a fill flash was absolutely necessary. Without it, there would be no detail on the man’s dark face.
January 2, 2011 by Richard McGuire · Leave a Comment
One of the things I especially like about the Ottawa area is the changing seasons. They offer lots of opportunities to photograph the same subject with sharply different seasonal moods.
I admit though that Ottawa has far too much winter, and not enough of the other seasons. Spring is short, and the tulips bloom for a week or two, and then you’re into the hot, humid summer. Autumn colours are spectacular, but they disappear as quickly as they appear, leaving the trees bare. And then there are months on end of cold, bleak, snowy winter.
This year there was little snow in November and December, and as I write this on January 2, the snow is almost gone after a bit of a warm spell. Still, there are several more months of winter, and if history is any guide, there will be lots of snow before it’s over. Ottawa never lacks humidity.
This year was a challenge for shooting winter scenes. I wanted to refresh my Christmas card shots of the Parliament buildings, but had to leave it until a couple weeks before Christmas for lack of snow. Even then, the snow was light.

One of my favourite local places to shoot the changing seasons is the rapids at Blakeney, just west of Ottawa. Here the Mississippi River (no, not that Mississippi) tumbles over rocks and twists through forests. Setting my camera on a tripod, and using a slow shutter speed creates a smooth effect with the flowing water. Coloured autumn leaves, or ice on the shores create very different seasonal moods.

Autumn

Winter
It’s good to revisit the same locations and see how they change with the seasons. As I curse the seemingly endless Ottawa winters, I try to appreciate the variety of perspectives that our changing seasons bring.
November 21, 2010 by Richard McGuire · Leave a Comment
There’s a lot to be said for shaking things up and photographing new kinds of subjects. So when one of my Flickr contacts announced that in late September there would be a model shoot in Gatineau, I decided to show up. The event was a fundraiser for the local SPCA, and was billed as a chance for local photographers to meet local models and shoot pictures on a boat.
I’ve had very little experience with this kind of photography. Many years ago I shot a couple rolls of film of a co-worker who had aspirations of being a model, but we did it outdoors entirely with available light. This time I wanted to get some practice shooting human subjects with my Nikon SB-900 flash unit and a diffuser.
It was a fairly informal event, and people were friendly. I chatted with a few of the models. One girl told me she tried to sign on with an agency, but they rejected her because of a cheek piercing. I was a bit surprised that in this day of Photoshop and many different fashion tastes that it would be an issue, but I guess the fashion business is pretty competitive and ruthless. All in all, there were about eight or nine models and a few more photographers — some who seemed to be fairly experienced.
Sometimes several photographers shot the same model or models at once, taking turns shooting, and announcing by counting down so that the models knew where to look. The models all seemed to be experienced, and were adept at changing their poses.
It’s definitely tougher than landscape photography, where you can take a lot of time to set up the shot. Here you have to work quickly, paying attention at the same time to the camera and its settings and also to directing or responding to the model. And the added dimension of flash complicated it more.
After taking a number of shots on the boat and outside it, we headed over to a nearby gym just as it was starting to rain. Here, it was even more challenging because of the tight indoor space and the presence of gym equipment and mirrors everywhere. The mirrors made for some interesting reflections, but it was a challenge to keep photographers and flashes out of the shots.
Together with another photographer, Graeme, we worked with two different models, Isabelle and then Jessica as they used the gym equipment. Sometimes male model, Yan, also posed with them. Graeme was great at coming up with posing ideas, and several times he loaned me his SB-800 so that I could get a few shots using multiple lights, which he helped me set up.
I don’t know that I’m ready to become a glamour photographer, but it was lots of fun and I learned a lot.


September 17, 2010 by Richard McGuire · Leave a Comment
At the end of July, I drove down to Toronto to take in the finale of Caribana, a huge Caribbean festival that culminates in a parade. Over a million people attend, and thousands who participate in the parade get decked out in glittering carnivalesque costumes.
The parade, July 31, was on a hot, sunny day. The sun was brilliant, resulting in dark shadows. As a result, I photographed it using a fill flash a lot, and also took in much of the action from behind barriers using a 70-300mm long zoom lens to zero in on the action from the distance. Before the parade, I took some pictures of costumed participants arriving. Normally, I just asked them to pose, and with the exception of just one couple, all were willing to do so. I know many were proud of how they looked, and when people are having fun, they’re much more willing to let you take their picture.
Here are a few shots I took before and during the parade:


July 18, 2010 by Richard McGuire · Leave a Comment
One mistake that beginner photographers often make is posing people in bright sun with the sun directly overhead or behind the photographer.
While this can result in interesting light when the sun is very low in the sky at the beginning or end of the day, most of the time it just results in harsh shadows and washed out highlights. And subjects often squint in the bright sun, making them less attactive.
A better solution, where possible, is to photograph subjects in open shade. This can be against a north-facing side of a building, or under a picnic shelter or anywhere else that’s not in the direct sunlight, but where reflected sunlight can enter from all directions to illuminate the scene. The shade of trees can be used, but often there’s a dappled light coming through breaks in the leaves that can ruin the shot.
Some photographers use translucent white panels between the sun and the subject. This works really well, but usually involves an assistant to hold the panel, or some kind of set-up with light stands to suspend the panel. Great light, but a little impractical for a lone photographer looking for candid shots.
Often there’s simply no alternative but to shoot in direct sunlight. In such cases, it’s best to try to put the sun behind the subject (but not aiming right at the lens, where it will cause flare), and then to light the subject with a fill flash. The fill flash will even out the light a bit, softening it in effect. It fills in shadows, like those under a hat brim, or around someone’s eye sockets and nose. It also increases the light on the subject in cases where the sun is behind them, so they aren’t silhouetted, but you can still sometimes get nice rim light from the sun behind.
Fill flash is one of the few times when the on-camera pop-up flash works reasonably well. That’s because it’s just fill — it’s not the main source of light. If you use a hot shoe flash, you can often leave the flash on the camera, with or without a diffuser. Sometimes you’ll want to reduce the flash output a little so the effect of the flash is less noticeable.
Below are a few shots where I used fill flash to advantage:

July 1 Canada Day in Ottawa is often very sunny, and this is especially the case shortly before noon. It’s a good time to take pictures of people celebrating, but harsh sunlight often makes people’s faces very contrasty with light and shadows.
In this picture of a girl getting her face painted, the sunlight was extreme, but was coming from behind the girl. Using a fill flash softened the light and shadows on her face, and almost gave the impression of shooting in open shade. In a few pictures in this series, my flash failed to fire, and the result looks very different with harsh shadows across her face. Using a fill flash in bright sunlight, it’s important to keep in mind the sync speed of the camera. On my Nikon D300, the sync speed is 1/250 of a second. Sometimes, especially when you want to soften your background, you need to use a higher speed than that. In such cases, it’s essential to make sure your camera is set to allow the flash to use Auto FP High Speed Sync, a setting that allows the flash to be used at faster shutter speeds.

The photo above was taken this month at the Medieval Festival in Osgoode, Ontario, just south of Ottawa. Here I was right in blazing afternoon direct sunlight, and there was no choice for this shot. I got down low and shot upwards so as to get a bit of the “victim’s” face and better show the action. And I used a fill flash in my hot shoe with no diffusion, and cranked it up an extra EV (f-stop). While it got rid of some of the harsh shadows on the subject, it still wasn’t enough to eliminate the shadow under the rim of the hat of the boy throwing a wet sponge. It’s not easy to overpower the light of the bright sun with a single flash.

In this picture of a soldier waiting to do battle in a re-enactment of a battle from the Seven Years War at Ogdensburg, New York, I also used a fill flash. The effect here is very subtle, and it would be difficult to tell just from looking that a fill flash was used. You still see a sharp contrast on his shoulder (viewer’s left) between the sunlit and shaded areas. In this case, the background was much brighter, and all the fill flash did was add a little light to the subject to reduce the gap in exposure between subject and background. Still, it improves the photo.
The sun is a very powerful element in outdoor photography, but sometimes we need to use a little bit of “sun” from our camera bags to control the light a little better.
July 3, 2010 by Richard McGuire · 1 Comment
One of my photo contacts looked at one of my shots from a recent trip to Montreal and suggested I was becoming a “veritable flâneur.”
In Quebec, the term “flâneur” has negative connotations — like vagrant, vagabond or loiterer. Some stores even post signs saying “defense de flâner,” suggesting they don’t want kids hanging outside the doorway after making their purchases.
In Europe, the term “flâneur” has other connotations. My photo contact referred me to the Wikipedia entry discussing the term “flâneur” as Charles Baudelaire intended it, meaning more of a “gentleman stroller of city streets” or someone who is a detached observer of city life. The article goes on to discuss how street photography has become a modern extension of the 19th century urban observer.
Montreal is a wonderful city in which to be a “flâneur” in Baudelaire’s sense of the term. It has such a vibrant mix of cultures set against exciting architecture, both modern and old.
As for street photography, Montreal presents a unique challenge. Quebec has the most restrictive laws against street photography in North America. Essentially, you can be sued if you publish a photo of someone without their consent and if they are identifiable. The exception, which seems to allow news photography, is if the photo serves the public interest (whatever that means). It’s a vague term that presumably suggests that art and documentation of city life are not in the public interest, whereas news reporting is. Whether or not a court would actually rule that the photo damaged a person is beside the point — few photographers can afford to go to court, so the law instead becomes a tool of blackmail. It’s as though the fundamental freedom of expression guaranteed by 2(b) of the Charter of Rights and Freedoms has only limited validity in Quebec.
Of course privacy is also a right, and I’ve seen some street photographers who cross the line in that regard. But I tend to think that if a person is doing a public activity in a public place, they should be fair game for a documentary style of photographer.
Being unprepared to challenge Quebec’s law, I reluctantly change my photography style in Montreal. I tend to shoot people in ways that they are more anonymous, either by using motion blur, or photographing from behind. And I take more pictures of buildings and non-human subjects. That’s not to say I’ll always obscure people’s identities if they’re doing a public activity in a public place, but I usually err on the side of caution. And sometimes the results work well.


May 20, 2010 by Richard McGuire · Leave a Comment
In an earlier post, I suggested that good photographic technique and creativity were only part of what makes a good photo. Another key ingredient is access to interesting subject matter.
This can mean flying off to a distant corner of the globe to visit a remote Asian monastery. Or, often, it can be a subject much closer to home that the photographer has unique access to because of his or her job, family, or friendships. When you think about it, most people have access to something in their lives that other people don’t see, and this can make a good photographic subject. It can be something as seemingly mundane as an inside view of a factory or a farm or other place of work. Provided you’re allowed to take photos, it may be a chance to take something that most people don’t see, allowing you to present some unique images.
Many thousands of visitors to Ottawa visit Canada’s beautiful Parliament buildings every year, and many of them take pictures of the Centre Block and Peace Tower. It’s a beautiful view, and as long as their photographic technique is good, the picture will look good. Only a much smaller number will come away with unique-looking pictures as the result of creatively using a different point of view or technique to create an unusual photo. Very few, however, have access to much more at Parliament than the main public areas.
In my day-to-day work, I often see behind the scenes in Canada’s political process, and occasionally I’m allowed to take pictures.
I admire the photography of Ottawa photographer Jean-Marc Carisse, who I’ve met on several occasions. Carisse was photographer to such Canadian Prime Ministers as Pierre Trudeau and Jean Chrétien and he’s often photographed international leaders when they visited Ottawa or when Canadian leaders travelled. One of my favourite Carisse photos shows Chrétien and Bill Clinton playfully climbing a garden railing to give the media the slip. I know some of the regular news photographers were envious of Carisse’s access, which enabled him to get pictures that were not accessible to the media. Indeed, the title of Carisse’s coffee table book is Privileged Access with Trudeau, Turner and Chrétien. Carisse is a talented photographer, but his work owes much to that privileged access.
While I don’t have Carisse’s skills or the privileged access he once had, I’m occasionally called upon to take pictures of Liberal Leader Michael Ignatieff at various events. Often these are public events where he’s delivering a speech at a poorly lit podium — hardly the kind of scene that lends itself to a Carisse-style photo.
Recently, on May 12, Mr. Ignatieff’s birthday, his wife and his staff organized a surprise birthday party for him at Stornoway, the official residence of the Leader of the Opposition. I was pleased to be asked to take photos at the party, and I had a lot of fun taking candid pictures of his staff socializing. When people are having fun, they are often more willing to be photographed, as long as they trust that you won’t embarrass them by using less-than-flattering pictures.
When the Leader arrived home with his wife, he was caught by surprise for the second year in a row. He was good natured about it, and spent a while socializing with staff and blowing out his birthday candles. But, this happened to be the night of the seventh and deciding hockey playoff game between the Montreal Canadiens and the Pittsburgh Penguins. And many of the guests were already watching the game on TV.
Mr. Ignatieff is well known as an intellectual, but it’s less known that he’s a rabid sports fan. Still wearing his suit, like his guests, he and his wife Zsuzsanna sat in front of the TV to cheer the Canadiens to their 5-2 victory. Bouncing my flash from the ceiling of the little room at the historic Stornoway house, I shot a few pictures of them engaged in the game. It was a chance to see a side of Mr. Ignatieff that the public doesn’t see.
One of those shots was used by Globe and Mail columnist Jane Taber in her blog. I have a long way to go before my photos can match those of someone like Carisse, but the experience was a lesson in the value of using uncommon access to get photos from an unusual point of view.

Cheering on the Habs
")
Cheering on the Habs (2)
May 11, 2010 by Richard McGuire · 1 Comment
Every year at tulip time, I try to get out and photograph the tulips. In Ottawa, the two nicest seasons, spring and autumn, are also the shortest. The fall colours last a few weeks, but the spring tulips last mere days.
One view I especially like is looking across the Ottawa River towards the Parliament Buildings from a tulip bed just below the Museum of Civilization on the Gatineau (Hull), Quebec side of the river. There’s a plaque there honouring Malak Karsh, the late photographer who produced spectacular colour images of Ottawa.
One evening after work I headed down there, impressed by the changing light as storm clouds moved in, but sun and blue sky kept emerging from behind them. I set up my tripod and tried a number of shots, often using a neutral density graduated filter, which darkens the exposure of the sky at the top to balance the light better with the ground below. This is especially useful when, as that evening, the tulips in the foreground were in shade, but Parliament Hill is in sun. I also have a few coloured graduated filters, and I sometimes use a mauve one to give a slight fantasy look to the sky.
I took a few multiple exposures for HDR (high dynamic range), another technique used to overcome a wide range between light and dark in a scene. You take multiple identical shots at different exposures — typically I do five ranging from much too dark to much too light. These are then combined on a computer to create a scene where there are no dark silhouettes or white areas of blown-out light. I got a few images I liked.

Tulips and clearing storm clouds, Ottawa
I also got a number of shots that were more ho-hum. One of these I had taken at five different exposures with the intention of doing an HDR. Suddenly, looking at one of the exposures, I got an idea. What if I showed the Parliament Buildings darker, as a silhouette, but lightened the rest of the scene just a little bit? It was one of the shots with the mauve graduated filter, so the sky had just a little bit of a dreamy mauve cast. I decided to play with a single image rather than do an HDR. I made only small tweaks — no fancy processing — and then I layered on the Parliament buildings from one of the darker exposures so they appeared as a silhouette. This was the result.

Dark fantasies, Ottawa
To many foreign viewers of my photos, our Parliament buildings often suggests a castle, with their neo-gothic architecture. I imagined a sinister castle, perched on a hill, the home of frustrating bureaucrats. It reminded me of Franz Kafka’s novel The Castle, which I read many years ago. Its about a surveyor who is never able to get satisfactory answers from the bureaucrats in the castle, who bungle his case and cover up their mistakes. Sometimes the workings of our government seem very Kafkaesque.
In one of the Flickr photo groups, Critique 2, I suggested the Kafkaesque nature of the picture. One of the group members, a fan of Kafka, agreed as far as the castle went, though thought the garishly colourful tulips were out of place for Kafka.
“Maybe Kafka goes to Disneyland,” he suggested.
And yet, it’s one of the simpler shots. And despite the layering of the silhouette, it’s also one of the least processed of that day’s selections from the shoot. It’s hard to account for what people will like, but a simple image with interesting colours that evokes fantasy seems to be popular.
April 30, 2010 by Richard McGuire · Leave a Comment
Perth, Ontario is probably one of the province’s prettiest towns. Not surprisingly, given its name, Perth was settled by Scottish settlers in the 19th century, and it has some wonderful old stone buildings. The little Tay River runs through the town, and through a picturesque green Stewart Park where broad willow trees cling to its banks.
I happened to pass through Perth last weekend, not knowing until I got downtown that my visit coincided with Perth’s Festival of the Maples. It was a nice day and I had a brand new camera lens I was eager to try out, so I strolled around the festival taking pictures.
Small-town fairs are a great subject for photography. Most people are having fun, and so they aren’t usually bothered by the presence of a camera. And they are doing interesting things. When I worked for small-town newspapers several decades ago, I used to enjoy shooting off several rolls of film at the various fairs and festivals.
Being unfamiliar with my lens, I decided not to ask people to pose this time, and instead shot some of the non-human elements that told the story of the Festival of the Maples. Here are a few shots.

Goat kid in petting zoo

Grilling sausages

Duck pond at the fair


